To install java ubuntu, use the APT package manager to install OpenJDK, the open-source implementation of the Java Platform. By running sudo apt update followed by sudo apt install default-jdk, you can quickly set up the Java Runtime Environment (JRE) and Development Kit (JDK) on Ubuntu 24.04 or 22.04.
This guide provides step-by-step instructions for the command line, explains how to manage multiple Java versions, and helps you determine the server resources needed for your specific Java application.
How to Check Prerequisites Before You Install Java on Ubuntu
Before starting the installation, you must ensure your system package index is current and your server architecture is compatible with the JDK version you intend to use. Verifying these prerequisites prevents dependency errors and installation failures during the setup process.
Picture a Jaipur fintech startup setting up a new production server for daily transaction processing. To ensure the environment is stable, their engineers follow a pre-installation checklist to avoid version mismatches that could crash their payment gateway.
Updating your package repository
The first step is to synchronize your local package index with the remote Ubuntu repositories. This ensures you download the latest security patches and the most recent stable build of OpenJDK.
Run the following command in your terminal:
sudo apt updateThe expected output will show the system hitting the official Ubuntu archives. If you see “Reading package lists… Done”, your server is ready to fetch the Java binaries.
Checking Ubuntu version and architecture
You need to know your OS version and CPU architecture to ensure the JDK package is compatible. Most modern servers use x86_64 (amd64), but some ARM-based instances require different binaries.
Use these commands to verify your environment:
lsb_release -a
uname -m
The lsb_release command confirms if you are on Ubuntu 24.04 or 22.04, while uname -m identifies the architecture. For example, an output of x86_64 indicates a 64-bit Intel or AMD processor.
To ensure your environment is production-ready, we recommend using a VPS with Linux Ubuntu that provides dedicated resources to handle the JVM’s memory demands.
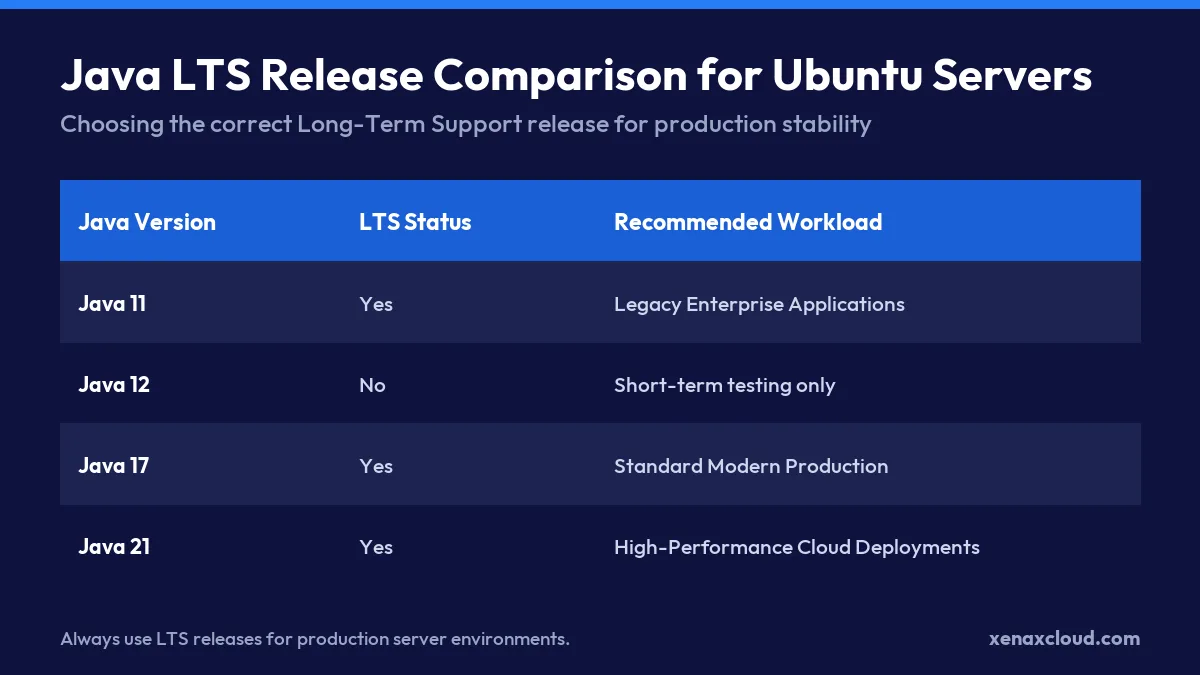
How to Install OpenJDK on Ubuntu Using the Terminal
You can install OpenJDK on Ubuntu by using the APT package manager to fetch the official open-source binaries from the Ubuntu repositories. This method is the most secure way to manage your Java installation because it ensures all files are digitally signed and verified by the OS maintainers.
Running the default JDK installation
If you want the standard version of Java that is most compatible with the current Ubuntu release, you should install the default JDK package. This command automatically selects the most stable version recommended for your specific OS version.
Run this command to start the process:
sudo apt install default-jdk -yThe -y flag automatically answers “yes” to the prompt, which is helpful when you are automating server setups via SSH. Once the process finishes, the terminal will return to the command prompt, indicating that the binaries are ready for use.
Installing specific Long-Term Support versions
Many developers prefer to install a specific Long-Term Support (LTS) version to ensure application stability over several years. For example, a developer might specifically need OpenJDK 17 or OpenJDK 21 for a project.
To install a specific version, use the following commands:
sudo apt install openjdk-17-jdk -y

sudo apt install openjdk-21-jdk -y
If you are managing a high-performance environment, such as a Dedicated Server for heavy computation, you might want to verify which version is currently being pulled from the repositories. You can check the available versions in the Ubuntu archive by running apt cache search openjdk, which lists every available JDK package compatible with your system.
How to Verify Your Java Installation and Compiler
You can verify your Java installation by running the java -version and javac -version commands in the terminal to confirm the binaries are active and the system path is correctly configured. This ensures that both the runtime environment and the compiler are ready to execute and build Java applications.
Checking the Java runtime version
The Java Runtime Environment (JRE) is the part of the Java platform that allows you to run compiled Java code. To check if the runtime is active, run:
java -versionThe expected output will look like this:
openjdk version "17.0.x"
OpenJDK Runtime Environment (build 17.0.x+x)
OpenJDK 64-Bit Server VM own 17.0.x+x
If you see this output, the Java runtime is active. If you get a “command not found” error, the installation failed or the system path is not updated.
Verifying the javac compiler
The Java Compiler (javac) is the tool that converts human-readable .java files into bytecode. This is part of the the JDK (Java Development Kit) and is essential for developers.
Run this command to verify the compiler:
javac -versionThe expected output should be a simple version string, such as javac 17.0.x. This is a lenguaje-specific verification that confirms you can now compile source code.
To ensure your server can handle the JVM’s memory overhead, we recommend checking your available system RAM. You can run free -h to see if you have at least 2 GB of RAM for basic apps, or 8 GB for production workloads. For a Jaipur fintech startup deploying a Spring Boot microservice, 8 GB of RAM is necessary to handle concurrent API requests and memory-intensive garbage collection routines.
To learn more about managing your runtime environment, you can read our guide on how to install java runtime ubuntu.

How to Install Multiple Java Versions on Ubuntu
You can install multiple versions of Java on Ubuntu by installing different OpenJDK packages side-by-side, as the system stores them in separate directories. This allows you to maintain legacy support for older applications while developing new features on the latest LTS release.
Installing OpenJDK 11 and OpenJDK 21
To support a range of application requirements, you can install several versions of the Java Development Kit (JDK) using the apt package manager. For example, if you need to maintain an older enterprise app on Java 11 and a modern microservice on Java 21, run these commands:
sudo apt install openjdk-11-jdk -y
sudo apt install openjdk-21-jdk -y
Once these commands complete, Ubuntu stores the binaries in /usr/lib/jvm/. You can list all installed Java environments by running ls /usr/lib/jvm/, which will show directories for each version you have added.
Managing side-by-side Java packages
Managing multiple versions requires understanding how the system handles the default path. When you install multiple JDKs, Ubuntu uses a system called “alternatives” to link the generic java command to a specific version.
To ensure your server has enough overhead for multiple JVMs, consider the memory footprint. A standard JVM instance typically requires a minimum heap size. If you run three different Java versions for three separate apps, your RAM calculation looks like this:
| Application | Java Version | Min Heap (Xms) | OS Overhead | Total RAM Needed |
|---|---|---|---|---|
| Legacy API | Java 11 | 1 GB | 512 MB | 1.5 GB |
| Modern App | Java 21 | 2 GB | 512 MB | 2.5 GB |
| Build Tool | Java 17 | 1 GB | 512 MB | 1.5 GB |
| Total | 5.5 GB |
Because of this cumulative memory usage, a KVM VPS with at least 8 GB of RAM is recommended for developers running multiple environments.
How to Switch Between Multiple Java Versions
You can switch between different installed Java versions on Ubuntu by using the update-alternatives utility. This tool allows you to change which version the system uses as the default whenever you run the java command.
Configuring default java with update-alternatives
The update-alternatives system manages multiple versions of the same software by creating symbolic links to the actual binaries. To begin the switching process, you must run the configuration command with administrative privileges.
Run this command to manage the Java runtime:
sudo update-alternatives --config javaIf you also need to switch the version of the Java compiler to match your runtime, run:
sudo update-alternatives --config javacSelecting the active runtime number
After running the command, Ubuntu will display a list of all installed Java environments in your terminal. You will see a table similar to the one below:
There are 3 choices for the alternative java (providing /usr/bin/java).

  Selection    Path                                            Priority   Status
------------------------------------------------------------ Alternatve
* 0            /usr/lib/jvm/java-21-openjdk-amd64/bin/java      2111      auto mode
  1            /usr/lib/jvm/java-11-openjdk-amd64/bin/java      1111      manual mode
  2            /usr/lib/jvm/java-17-openjdk-amd64/bin/java      1711      manual mode
  3            /usr/lib/jvm/java-21-openjdk-amd64/bin/java      2111      manual mode

Press <enter> to keep the current choice[*], or type selection number:
To change your version, type the number corresponding to your desired Java release (for example, 2 for Java 17) and press Enter. The asterisk * indicates your current active version.
Before switching, use this checklist to ensure a smooth transition:
- Run
java -versionto confirm the change took effect immediately. - Check
javac -versionto ensure your compiler matches your runtime. - Verify that your application’s environment variables, such as
JAVA_HOME, point to the new path in/usr/lib/jvm/. - Restart any running services, such as Tomcat or Jenkins, to ensure they pick up the new version.
Which Server Resources Do Java Applications Need?
Java applications require significant RAM and CPU to manage the Java Virtual Machine (JVM) and handle garbage collection efficiently. Selecting a server with sufficient resources prevents “Out of Memory” errors and ensures your applications remain responsive during traffic spikes.
Calculating RAM for Java heap sizes
The most critical resource for Java is memory, specifically the heap space where objects reside. Unlike simple web scripts, Java applications often reserve a large block of RAM upfront.
Consider a Jaipur fintech startup deploying a Spring Boot microservice on Ubuntu 24.04. To handle concurrent API requests and memory-intensive garbage collection routines, they need at least 8 GB of RAM. If they only allocate 2 GB, the JVM may trigger frequent “Stop-the-World” garbage collection cycles, causing noticeable latency for their users.
When planning your deployment, use this rule of thumb for memory allocation:
| Component | Resource Type | Recommended Allocation |
|---|---|---|
| JVM Heap (Xmx) | RAM | 50% to 70% of total system RAM |
| OS & Background Services | RAM | 1 GB to 2 GB |
| Buffer/Cache | RAM | Remaining available memory |
Selecting CPU cores for compilation workloads
CPU cores determine how quickly your server can compile code and process complex logic. While a running application might only need 2 vCPUs, tasks like running a Jenkins build or compiling large Maven projects are highly parallelizable and benefit from more cores.
If you are running heavy CI/CD pipelines alongside your production apps, you should look for higher core counts. For instance, moving from a 2 vCPU setup to a 4 vCPU setup can significantly reduce the time spent in the “Building” stage of your deployment.
To run your Java workloads with low latency and dedicated resources, deploy a Speed KVM VPS 2 from Xenax Cloud.
| Plan | vCPU | RAM | SSD storage | Bandwidth | Price |
|---|---|---|---|---|---|
| Speed KVM VPS 1 | 2 | 4 GB | 40 GB | 2 TB | ₹599/mo |
| Speed KVM VPS 2 | 4 | 8 GB | 50 GB | 2 TB | ₹799/mo |
| Speed KVM VPS 3 | 8 | 16 GB | 70 GB | 4 TB | ₹1,399/mo |
| Speed KVM VPS 4 | 12 | 24 GB | 80 GB | 6 TB | ₹1,799/mo |
| Speed KVM VPS 5 | 16 | 32 GB | 100 GB | 8 TB | ₹2,399/mo |
| Speed KVM VPS 6 | 20 | 40 GB | 120 GB | 10 TB | ₹2,999/mo |
| Speed KVM VPS 7 | 24 | 48 GB | 150 GB | 10 TB | ₹3,499/mo |
| Speed KVM VPS 8 | 32 | 64 GB | 200 GB | 10 TB | ₹4,599/mo |
Every Speed VPS: KVM, full root, 500 Mbps port, weekly backup included, Indian data centre. Monthly, billed in INR. cPanel licence not included.
Install Java Ubuntu: FAQs
How do I install Java on Ubuntu using the command line?
You can install Java by using the apt package manager with the command sudo apt install openjdk-jdk. For a specific version, such as OpenJDK 17, use sudo apt install openjdk-17-jdk -y.
Which Java version should I install on Ubuntu for production?
For production environments, we recommend installing a Long-Term Support (LTS) version like OpenJDK 17 or OpenJDK 21 to ensure application stability. These versions provide long-term security updates and are widely supported by enterprise frameworks.
How do I switch between multiple Java versions on Ubuntu?
You can switch versions using the sudo update-alternatives --config java command. This opens a list of installed Java environments where you can type the selection number of the version you want to set as the default.
Can I install Java on Ubuntu without root privileges?
The guide describes installation using sudo, which requires administrative root privileges to write to system directories like /usr/lib/jvm/. Without root access, you cannot use the apt package manager to install Java system-wide.
How do I check if javac is installed correctly on my server?
Run the command javac -version in your terminal. If installed correctly, the system will return the version string of the Java compiler, such as javac 17.0.x.